Single store - Offline terminals

For whom?
This setup can be used for a small single store with several terminals. A store server hosts the database and there the Site Manager and Site service are installed.
Items, prices, discounts and so on are controlled in the Site Manager at back office.
In this type of system, you typically have one computer for the store applications, and one device for each of the POS terminals. The installation of every LS One POS is identical in every way except for the Terminal ID they are defined with.
Pros
- Offline setup - POS terminals not relying on a connection to a database server to be able to sell
Cons
- More complicated setup with the replication
Before you start
- Draw up a topology diagram of your machines and note down all the IP addresses / network names, SQL server names, database users and passwords before you start the installation process.

Make sure to take backups of the back office database to an external drive on a regular basis.
Setup for the back office machine/the store server
- Download the installation files of the LS One suite to your machine.
The installs are found on the partner portal.
Is there a SQL server or SQL Express installed on the machine?
If not make sure to download the Site Manager installs that includes the SQL Express server install you need for your machine.
- Installation:
- Follow the instructions on how to install the Site Manager
- Follow the instructions on how to install the Site Service
- Install the Data Director. Follow the installation instructions in the Data Director User guide that comes with the installation file.
- Run the Site Manager activate your license
- If you do not have a database server on your machine you need to install the SQL Express server that comes with your install.
- Connect the Site Manager to a data source
- If you do not have a database you are instructed in how to create one.
- If you need assistance with creating all the necessary data see Store setup checklist.
- Before you can configure the Site Service and data replication for your site / store and terminals you must create one site / store and one terminal for each of the POS terminals to be installed.
-
Configure the Site Service to connect to the back office database on the store server.

Make sure to use the network name or local IP address of the server in the Site service profile and do not to use localhost because the POS terminals which are not located on the same machine will be using this information to connect to the Site service.
-
Configure the Data Director and setup the data replication.
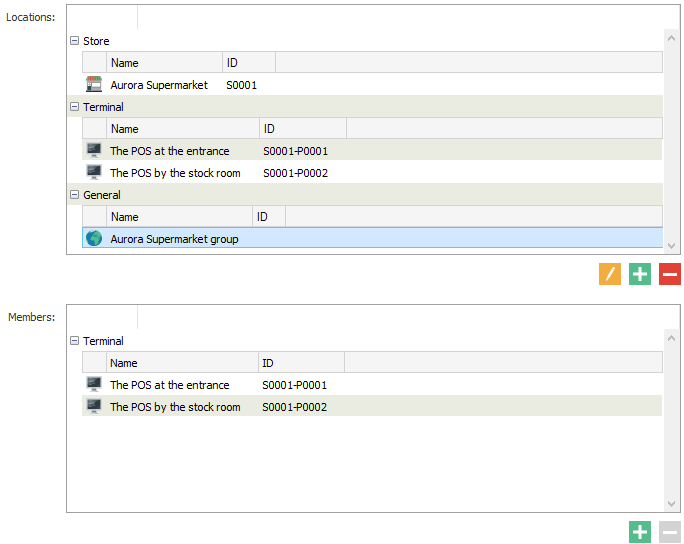
Each location must connect to its own database server and database but they should all have the same distribution server, the Data Director is installed on the back office machine.
Distribution server: Store server / back office machine
Distribution locations to be setup: Store location is the back office store server and each POS terminal has its own distribution location that needs to be setup.
Next step is to setup the POS terminals.
Setup for the POS terminals
For each one of your POS termnals do the following:
- Download the installation files of the LS One POS to the POS terminal.
The installs are found on the partner portal. You may need an install that contains an SQL Express install that is if the SQL server is not yet installed on the POS terminal.
Is there a SQL server or SQL Express installed on the POS machine?
If not make sure to download the LS One POS install that includes the SQL Express server install you need for your machine.
- Follow the instructions on how to install the LS One POS
- To install the SQL express run the LS One POS application
 . If no SQL server has been setup on the machine the POS will offer to install it when first opened. The procedure will launch automatically. This might tak e a few minutes but the POS will start when it finishes.
 - Create a new database for the terminal and connect to the correct store and terminal.
- Activate the LS One POS license
Data replication
Now all applications are installed but no data exists on the POS terminals. The data you created at the back office needs to be replicated from the back office / store server to the POS terminals.
When the terminal databases are ready the store can replicate data to its terminals.
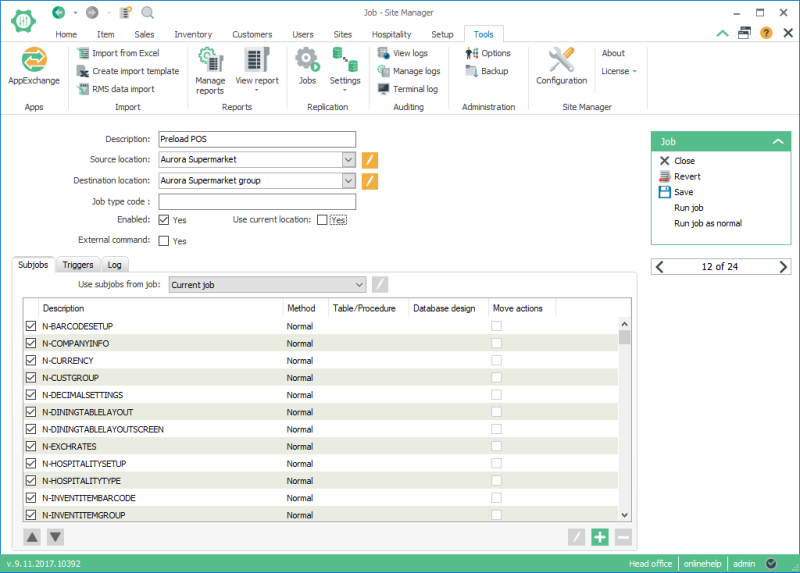
- In the Site Manager on the store server / back office go to Tools > Replication > Jobs
- Select the job Preload POS and press the edit
 button below the job list.
- Select the store you are located in as a Source location and the store group as a Destination location as shown in this image:
- In the Job panel on the right-hand side, select Run job to send the data to the terminal databases.
Before you run the replication job for the first time you can open the Data Director debuggin windows to see what happens when you run the job. Then it is easier to see if everything is setup correctly and the data flows to the correct destination.
To learn how to debug the data replication read this.

When you have preloaded the POS terminals with the data you can test logging into the terminals with any of your users and you can check the connection to the Site service by running the Inventory lookup operation.
Now you are ready to start running LS One for your store. All items, prices and discounts will be created in the back office and the POS terminals are connecting directly to the same database so no data replication is needed.
Transaction replication
When everything has been set up as described above, items can be sold on the POS terminals. All transactions made on the terminals are pulled to the store database for an inventory update and for end-of-day procedures such as statement posting.
To get the transaction from the terminals:
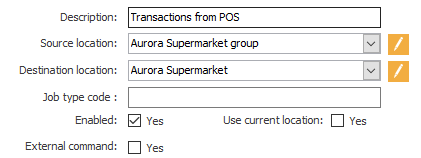
- In the store go to Tools > Replication > Jobs.
- Select the job Transactions from POS and press the edit button below the job list.
-
Now you want to replicate from the terminals to the back office so select the store’s store group as a Source location, and the store as a Destination location as shown on this image:
-
In the Job panel on the right select Run job to get all transaction data from all the terminal databases to the store database.
| Inserted: | June 2018 |
| Version: | LS One 2018 |

